


2024 Dental Handpiece Maintenance Guide
July 19, 2025
Your handpieces are an essential part of your job, so it is essential that you take care of them. Regular dental handpiece maintenance and proper care can provide you with the best performance and lifespan from your handpieces, reducing the likelihood of any failures while in use. Read our 2024 Dental Handpiece Maintenance Guide for a comprehensive overview of how to maintain your dental handpiece(s).
Content:
Always read and follow the instructions for use and care! Manufactures must provide adequate instructions on how to prepare medical equipment for use on patients. Not all dental handpieces are provided with the same care. You should always refer to and follow the manufacturer's instructions for use (IFU) and follow the instructions carefully. If the manufacturer instructions are not included with the handpiece, you should be able to download the IFU from their website.
Clean your Dental Handpiece. Dental handpieces are the most used instrument in dental offices. When in use, the patient's blood, salvia, and other remnants will contaminate the dental handpiece and contaminate the interior of the dental handpiece. Handpieces should be cleaned immediately after each patient's use, every day!
Why Use a Dental Handpiece Cleaning Machine
The use of a dental handpiece cleaning machine is crucial for several reasons:
- Efficiency: These machines clean and lubricate handpieces faster and more thoroughly than manual methods. They save time, allowing dental professionals to focus on patient care.
- Consistency: A cleaning machine guarantees a consistent, high-quality cleaning every time, eliminating the risk of human error.
- Longevity: Regular and proper maintenance using a cleaning machine extends the lifespan of handpieces, saving costs in the long run.
- Safety: These machines not only clean but also sterilize handpieces, reducing the risk of cross-contamination and ensuring patient safety.

For a range of dental handpiece cleaning machines and other dental handpiece maintenance products, visit our products page at HSI Outlet.
Step 1: Exterior Cleaning
For low speed attachments, please refer to your specific item’s IFU for specific requirements.
- Most low speed attachments do not require lubrication (lube free).
- Use a damp cloth to wipe the attachment
- Do not place in an ultrasonic cleaner
- Prior to sterilization, remove separable components
For high speed hand pieces, do not place the handpiece in water. Avoid wiping the exterior with any kind of disinfectant or any wipe with alcohol on it, instead use a paper towel under warm water and wipe it down with it. Dry the handpiece thoroughly.
Once you complete, you can move to the next step.
Step 2: Lubrication
(If your handpiece is lube free, you can skip this step)
Your dental handpiece maintenance continues. Once you are finished cleaning the exterior of your handpiece, lubricate your handpiece according to the user manual. Overall, you are placing a couple of drops of oil into the drive line of the handpiece, which is usually located at the bottom. Once the oil has been dripped into the tube, operate the handpiece for about 10 seconds to get rid of any excess lubricant.
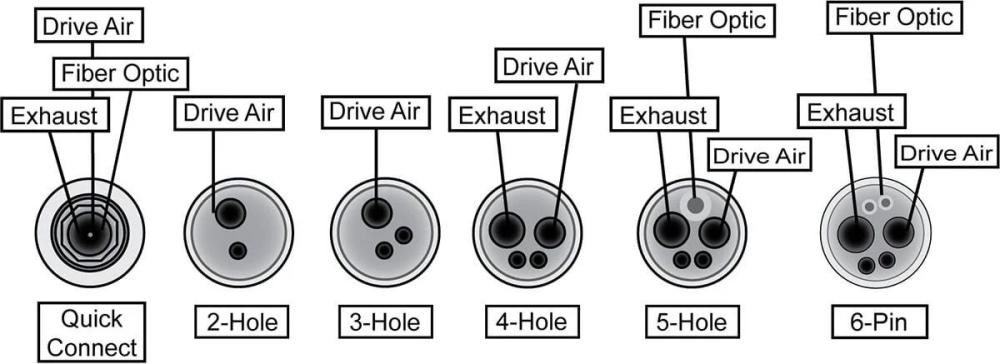
There are numerous high speed handpiece couplers on the market. This diagram helps you determine the location of the air drive on your handpiece depending on the connection. Knowing your connection type is essential to your practice as the handpiece itself, knowing the difference is essential for a smooth and professional practice. Consider your high speed handpiece features and compatibility before you purchase your handpieces.
If you use lubricated handpieces, an automatic handpiece maintenance machine can be a great option for your office, reducing your time. Most machines will operate high speed handpieces, low speed attachments, and electric attachments. See how it works
ProScore's Smart Cleaner is a more affordable option, it prevents residue and particle build-up in the handpiece water line. Biofilm and microparticles in the water can cause blockage in the handpiece water line. This tool is easy to use, watch here!
Step 3: Sterilize Your Handpiece
The final step in dental handpiece maintenance is sterilization. If your handpiece isn’t completely cleaned prior to sterilization, then the dirt remaining on and in the dental handpiece will become solid dirt after high temperature sterilization. To ensure a proper sterilization of your handpiece, refer to your sterilizer's instructions for loading.
When you are done seeing patients for the day, remove the bur and place your handpiece in a sterilization bag inside the sterilizer, following the sterilization process; making sure it goes through the entire process. Allow the handpiece to cool off naturally before using it on a patient.
Troubleshooting Your Dental Handpiece
It is important to be observant before and after dental handpiece maintenance. Pay attention to unusual behavior such as abnormal noise or difference in appearance. If you notice anything strange with your handpiece, contact handpiece and small equipment repair service. Our skilled technicians are specially trained to troubleshoot and repair your handpiece. Call 1-800-235-6337 (prompt 2). Here are a few tips to check prior to sending in for repair:
- If your handpiece is not operating smoothly, it could be that the turbine is worn out. A faulty turbine will decrease the efficiency of the handpiece. Replace the turbine when the handpiece is not operating at full speed and/or increases sharply in noise level.
- If the bur locks in the autochuck, the cause can be the use of non-ISO compliant bur. Always use a bur the full length of the chuck. If the bur is loose in the autochuck, then there is a possibility that the bur is not installed properly. Remove the bur from the autochuck and reinstall according to the manufacturer’s instructions.
- If the light is not working on your high speed handpiece this can mean the fiber-optic rods are broken. Send to an authorized handpiece repair service.
Dental Handpiece Maintenance Summary
The cleaning quality of your handpiece is a key factor in ensuring medical safety, improving the performance, and reducing expenses. If you follow manufacturer instructions and the instructions mentioned above for your dental handpiece maintenance, you will increase the lifespan of your handpiece.
For other regulatory training, you can visit the links below:
Step by Step Manual Dental High Speed Handpiece Maintenance Procedure
PRE-STERILIZATION
- Clean external surface of handpiece by wiping with a damp toothbrush or paper towel. Do NOT run under water. Wipe dry after cleaning.
- Insert bur into chuck.
- (Disregard steps 3 − 8 if you have a MaintenanceFree or MaintenanceFree Ceramic Turbine)
- Spray cleaner into drive air line for 2-3 seconds.
- Rotate the bur back and forth between your fingers to loosen any debris inside the handpiece head.
- Operate handpiece over a paper towel to purge used lubricant and debris.
- Repeat steps 3 - 5 until expelled fluid is completely clear.
- Operate handpiece until all cleaner has been expelled.
- Wipe external surface with a dry towel to remove expelled fluid.
- Sterilize handpiece according to manufacturer’s instructions.
POST-STERILIZATION
- Allow sterilized handpiece to cool gradually to room temperature.
(Disregard steps 2 − 4 if you have a MaintenanceFree or MaintenanceFree Ceramic Turbine) - Verify that the bur is securely in the chuck.
- Apply 2 drops of lubricant into drive air line, or spray lubricant into drive air line for 2-3 seconds.
- Operate handpiece for 30 seconds over a paper towel to expel excess lubricant from the handpiece.
- Wipe external surfaces with a dry towel.
- Handpiece is ready for use.
PUSH BUTTON CHUCK MAINTENANCE
Twice a week
- Remove bur from handpiece
- Place 2 drops of handpiece oil into the chuck
- Insert bur into the handpiece.
- Run handpiece over a paper towel at 35 psi to expel excess lubricant.
- If your push button chuck is stiff, after step 2 hold the chuck open and work the bur in and out to flush out debris.
EXTERNAL MAINTENANCE
- Never use any type of cold sterile, alcohol, or disinfectant on your handpiece.
- Do NOT submerge handpiece in running water or ultrasonic cleaner.
- To remove debris from the outside of the handpiece, use a damp toothbrush, then use a dry paper towel to wipe off the outside of the handpiece. Discard the paper towel in a biohazard bin.
- Clean toothbrush with a cold sterile wipe or in an ultrasonic cleaner for 1 cycle.
- Rinse toothbrush thoroughly in water before repeating the cleaning process.
- To sterilize, see Pre-Sterilization instructions (on front page).
- Check sterilizer temperature. It should be no higher than 276°F (135°C).
OTHER HELPFUL TIPS FOR HIGH SPEED DENTAL HANDPIECE MAINTENANCE
- Always consult the manufacturer's instructions before performing any maintenance.
- Air pressure should be set to 30 − 35 psi
- Always insert bur completely into chucks.
- Never depress the push button to stop the bur.
- Avoid dropping the handpiece.
- Do NOT use cold sterile, alcohol or disinfectant on your handpiece.
- Check sterilizer temperature. It should be no higher than 276°F/135°C
- Before using handpiece or applying a load, be sure to run it for 10 − 15 seconds.
